Thursday, June 7, 2012

Basil, Parsley, Sesame, & Walnut Pesto


I heart pesto! The delicious taste of fresh herbs, olive oil and nuts is a perfect healthy dish for any season.  As a was perusing through pesto recipes, I read a very interesting blog post at www.101cookbooks.com that brilliantly explained why pesto in Italy tastes so different from most other common pesto.  The secret is chopping all the ingredients by hand!  So simple!  Yes, it is labor intensive, but its definitely worth it.  The texture and mouthfeel of little bits of herbs and flecks of pine nuts or walnuts just can't be done with a food processor or blender.  I'm already an avid supporter or chopping by hand as much as possible, our grandmothers didn't have food processors, and to be honest, I find the food processor to be more trouble than their worth.  All the different parts that need to cleaned afterwards is a pain in the tooshie.  For soups, I opt for an immersion blender, one of my favorite kitchen tools.  Anyways...back on track, pesto!  The following pesto recipe has a little Asian Thelma twist by adding sesame leaves, which adds a great flavor, and I've been on a walnut kick so I use walnuts here instead of pine nuts.  Hope you like it!
Ingredients:
Sweet Basil
Italian Flat Leaf Parsley
Sesame Leaves
(1 bunch of each)
Chopped Walnuts, 1/2 cup
Garlic, 3 cloves
Extra Virgin Olive Oil
Lemon

Instructions:
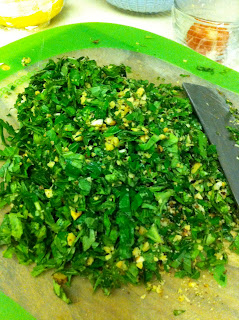
Rinse and dry the basil, parsley, and sesame leaves.  Run them through a salad spinner, if you have one, to get all the leaves as dry as possible.  Chop the walnuts (you can toast the walnuts first by heating them in a pan over medium heat for about ten minutes or so) and garlic first then add a handful of herbs as you go along.  All the chopping should take about 30 minutes until you get the consistency you want.  Put the whole mixture in a large bowl and add olive oil, also just as much as you like.  Generally you want the olive oil to cover the mixture and mix in.  Squeeze the juice of half a lemon and serve immediately with any kind of pasta you want!

Below is a picture of a basil, walnut, and parmesan pesto that is always a regular in our house.


The picture above is spaghetti and the one below is mixed in with orzo.

Friday, May 25, 2012

Taiwanese Meat Sauce

Taiwanese Meat Sauce

Think of this a a Taiwanese version of a bolognese sauce.  Just like with fried rice and many other traditional recipes, every Taiwanese home has their own version of this dish.  It's one of the staple foods that can be used multiple ways: mix it with rice or noodles for a quick meal or add a little to sauted vegetables to give a little extra flavor.  The ingredients to this recipe are ground pork, onion, ginger and soy sauce.  I like to add a few other ingredients in my personal version, hope you like it!


Ingredients:
1 lb Ground Pork
1 Medium Brown or Sweet Onion, Diced
1 Medium Carrot, Diced
2 Teaspoons of Grated Ginger
1-2 Cups of Diced Soy Beancurd
2 Star Anise
2-3 Tablespoons of Soy Sauce
1 Tablespoon of Rice Wine
1 Teaspoon of White Pepper
6 Soft Boiled Eggs (Optional)


Instructions:
Add a little cooking oil to a 3-4 quart sauce pot over medium high heat.  Do not add too much oil, as the ground pork should have enough fat content that will render when cooking, you just want a little oil to get the meat to start browning without sticking to the bottom of the pot.  Add the ground pork and slightly brown, stirring occasionally.  Add the onion, carrots, and soy beancurd; saute and cook for about 3-5 minutes until all the meat and veggies are browned.

Add the aromatics and seasoning: ginger, star anise, rice wine, white pepper, and soy sauce.  Give everything a good stir then ADD WATER, just enough to cover the mixture by about 1/2 an inch.  Bring to a boil, cover and simmer on low for about an hour.
***Optional eggs: my husband likes to add some soft boiled eggs to the pot at this point.  The eggs will simmer with the mixture and you'll end up with some lovely soy braised eggs.***
Once finished, fish out the star anise and dispose because they've done their job of adding a wonderful licorice flavor to the mixture but the stars themselves are not fun to bite into.  You can then spoon over rice or noodles and enjoy!  I like to cook this once a week and divide it up into small single portions then stick in the freezer.  ***DO NOT FREEZE THE EGGS***  Super convenient to defrost for a quick meal at home or pack up for lunch.


Lemon & Garlic Roasted Artichokes

Lemon & Garlic Roasted Artichokes
SO EASY!  Found whole artichokes at the Santa Monica Farmer's Market recently and decided to bring some home and try a few recipes.  This recipe was the easiest, most delicious and healthy too!  It was also my first time roasting artichokes and success on the first try is always a testament to the simplicity of the recipe.


Ingredients: 
Artichokes
Lemon
Garlic
Salt and Pepper


Instructions:
*You'll have to treat each artichoke one at a time.
Preheat oven to 425 degrees F.  Cut off the stem of the artichoke so you have a flat base.  Then cut off the top 1/3 of the artichoke to expose the center.  Place the artichoke standing upright in a shallow bowl and squeeze a little lemon juice all over the artichoke to prevent it from browning.  Carefully pry open the leaves a little bit, like opening up a rose's petals.  Squeeze some more lemon juice so that it gets in between the leaves then insert a couple fresh garlic cloves into the center of the artichoke.  Drizzle with olive oil and sprinkle a pinch of salt and pepper.  Wrap the whole artichoke up in heavy duty foil, making sure there are no cracks or tears.  Once its tightly sealed, place the foiled artichokes in a oven safe baking dish and roast in the oven for about 45 minutes for smaller size artichockes and 1 hour 10 minutes for larger ones.  When they're done, BE CAREFUL when handling them out of the oven!  Let them cool enought to handle, they will be piping hot.  Open up your precious foil pouches of yumminess, plate, and enjoy by pulling off one leaf at a time, eating the flesh at the base, and of course the heart.  DON'T FORGET THE GARLIC CLOVE, its the best part!  The garlic glove will be nice and sweet and carmelized. Probably not the best date dish, since your breath will be nice a garlicy for the rest of the day, but if both of you like garlic...it might be the perfect date dish. ;-)


Sunday, April 15, 2012

Soy Braised Ridgeback Shrimp
I saw these fiesty shrimp jumping around in one of the many live seafood tanks at the nearby 99 Ranch Market and I had to take them home with me.  Not only were they fresh and definitely alive, they were only $4.99/lb!  Shrimp and prawns are one of my husband's favorite foods and if you know anything about the price of live prawns, you know that they are pretty pricey.  The Santa Barbara Spot Prawns in a nearby tank were over $20/lb.  This peaked my curiosity even more about these wildly affordable underwater acrobats, so I bought a pound, brought them home and did a little research.  Apparently we don't see these shrimp around often because their shells are a bit harder and more abbrasive than regular shrimp AND they have this enzyme that causes them to turn an unattractive bruised color when they die so they have to be kept alive.  Despite these cons, one big pro is their tasty sweet meat, something between a large crawfish and small lobster.  Excited to try them out, I rinsed them with some water and decided on a simple quick braise preparation.
*Note: I wasn't joking when I say they jump!  When you bring them home, make sure you place them in some water in a large and deep enough bowl to contain some 6-10 inch jumps.

Ingredients:
1 lb Ridgeback shrimp (live)
Fresh ginger
Green onion/scallions
Rice wine
Soy sauce
Cooking oil


Julienne a couple ounces of fresh ginger and a couple stalks of scallions.  Heat a couple teaspoons of cooking oil in a large saucepan that has a lid.  Toss the ginger and scallions (reserve some of the green portion of the scallions for garnish) into the sauce pan and cook for about a minute then put the shrimp in the pan and drizzle with about a tablespoon of soy sauce, a couple tablespoons of rice wine, and cover.
Turn to low heat and let them simmer for only about 5 minutes or until they curl and turn a bright red.  DO NOT OVER COOK!

Plate and serve immediately with some of the sauce drizzled on and topped with the reserved julienned scallions.  DELISH!

Sunday, February 5, 2012

Grand Central Market


I live in downtown LA.  When I first moved here two years ago, at first glance there didn't seem to be many options for grocery shopping in DTLA.  After a bit of walking around and exploring, I discovered that I was wrong.  Yes, there aren't many big chain monopoly type grocery stores that everyone across America is used to seeing on every suburban corner, but there are a few other really good options.  There's only one Ralph's on 9th and Flower, which, I might add, is one of the best Ralph's I've been too.  They have a great gourmet cheese selection and I've even been able to get bone marrow on occassion, but there is only ONE in all of DTLA.  Another great place to get some inexpensive produce and pick up a snack is Grand Central Market.  This place has become my go-to on a weekly basis for basic produce and spices as well as grabbing a savory snack like pupusas at Sarita's or tacos at Ana Maria's.  Grand Central Market has actually been featured and used for a challenge on Top Chef.  It's not exactly an "open-air" market in that it is still somewhat enclosed in a building between Hill and Broadway on the corner of 3rd St.  There is an open seating area outside of the building where you can get some food at Flander's Frittes, a new location for the locan organic restaurant that started in Silverlake.
BBQ Pork Hash with over medium eggs and Brioche toast at Flander's Frittes
B.L.T.A.C. at Flander's Frittes
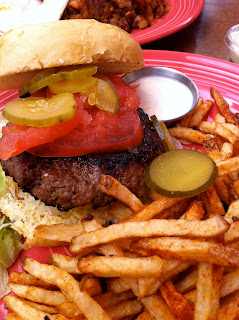
Lamb burger special with spicy fries at Flander's Frittes

Kale and caramelized apple salad topped with a fresh slice of tomato at Flander's Frittes


When you walk inside you walk into a real mercado in LA.  There are various stalls of grocers selling produce, meat, seafood, and spices.  There's also plenty of food stalls and tables for a yummy lunch.  The two stalls that always have long lines are Sarita's Pupuseria and Ana Maria's.  The produce is CHEAP!!!  We're talking 4lbs of Roma tomatoes for $1 cheap and a pint of blueberries for $0.50.  You might have to be careful picking because they may not be the best looking veggies but they are just as good as the big chain grocery stores.  This is not confirmed, but I've observed the people working at the produce stalls unload boxes of produce that they probably get from other grocers because of some defect.  For example a box of tomatoes is unwanted because of a few bruised or bad tomatoes.  These grocers get those unwanted boxes and pick out the bruised or damaged produce with lightening speed then sell it at extremely low prices.  I LOVE THIS!  By buying from these grocers, I feel like I'm doing some small part in supporting the local economy while also reducing waste.  Grand Central Market has become a part of my weekend morning routine.  Downtown is also so quiet and peaceful on the weekends, it's a wonderful time to wake up, take a walk to the market, pick up some groceries, get some good eats, and walk back.  Urban living with a small town feel.


Book Review: Plenty

Silviebursts gave me this wonderful book for Christmas and it's not only been a great read, but also a source of inspiration.  I share the same sentiments as Yotam Ottolenghi regarding vegetarianism.  In the introduction he makes a caveat that he is not by any means a strict "vegetarian" or a vegetarian at all.  He is merely a chef who loves all food from a wide variety of cultures and a multitude of ingredients including a plethora of grains, produce, and spices that prove to be anything but dull.  My aim is simply eating healthy and well without cutting out animal products altogether, and focusing on a more balanced and conscientious way of eating that incorporates the vast wealth of ingredients that can be found these days.  The recipes are simple and easy to follow with a sufficient amount of food porn to make a mouth moist with anticipation.  This book was given to me at a perfect time when I was feeling a bit tired of the same cooking techniques and vegetable combinations that I use on a regular basis.  The Stuffed Portobello with Melting Telaggio are a total crowd pleaser and I can't wait to try making the Saffrom Cauliflower!

Tuesday, January 17, 2012

Peas, Carrots, & Parsnips


I was soooooo excited when I saw fresh English peas at the Santa Monica Wednesday Farmer's Market a couple weeks ago!  I had never seen or cooked fresh English peas before so I picked a few handfuls and brought my veggie treasures home, eager to see if there really would be a big difference in taste and texture from the common frozen kind.  Final verdict is that there was a difference and they definitely were yummy, BUT I also learned some valuable lessons and had some of my unrealistic expectations shattered....

First of all, apparently 1 pound of peas is mostly pod weight and only yields about 1 cup of peas.  The pods are also too fibrous to eat, though perfect for soup stock!  Following my mantra of using as much of what I have as possible and not wasting food, I used the pods in my weekly homemade chicken stock.

Secondly, peas are in season in the Spring and well....it's in the dead middle of Winter right now so my face fell with disappointment when I opened up the pods to find shriveled little peas.  I guess I was expecting these round and plump peas the size of the tip of my pinky finger, not these little pellets.  Hopefully I will see them again in the Spring and be able to get my hands on some fatty peas!  With these two valuable lessons explained, on to my simple recipe.

I didn't want to take away much from the natural flavor of the peas so I decided to do a simple saute of the classic peas and carrots with a little addition of some beautiful parsnips I also picked up at the farmer's market.

Ingredients:
1     Large Carrot Diced
1     Parsnip Diced
1/2  Cup of English peas
Cooking Oil & Salt

Instructions:
Lightly grease a saute pan with the cooking oil and heat on medium-high.  Add the carrots and parsnips to the pan first because they will take a few minutes longer to cook. Saute over medium to medium-high heat for about 3-5 minutes then add the peas and toss, only cooking for about another 2-3 minutes.  Season with a good pinch of salt and you have a delightful little veggie side dish!

Monday, January 16, 2012

Easy Cabbage Stir Fry


This is my go-to fiber kick to balance my body after I've had too much animal based fatty foods.  I immediately feel healthier and cleaner after eating a big plate of simiple stir-fried veggies.  A nice salad can also to the same thing, but during the colder winter months, a cold raw salad doesn't seem as appetizing as a big hot plate of veggies.  Here's another tip about Chinese food, you will rarely see "salad" on a Chinese dinner table for any meal.  We eat a lot of vegetables and its almost always cooked.

The following dish is healthy, easy, cheap, and you can pretty much use any other veggies you want to add in with the shredded cabbage.

Ingredients:

1/2-1  Head of Cabbage julienned
* If you don't feel like practicing those knife skills, shredded will work just as well :)

1        Carrot julienned

1        Cup of julienned Snow Peas

Salt and Cooking Oil


Instructions:
Heat about a tablespoon of cooking oil in a large saute pan over medium-high heat.
Put carrots in the pan and cook for a couple minutes then add the snow peas.  Add a pinch of salt and toss then cook for a couple minutes.

Add the cabbage and sprinkle in about a teaspoon of salt then carefully toss and let cook down for about 5-8 minutes, tossing occassionally.

Once all the veggies are softened yet still has a little snap, your done!  Plate up and enjoy :)

Friday, January 6, 2012

Prosciutto Wrapped Dates


This was another big hit at our NYE party!  Quick, easy, and the perfect little bite of savory and sweet.

Ingredients:
Pitted Dates
Raw Almonds
Prosciutto

Instructions:
Toast the almonds in a fry pan over medium heat OR spread evenly on a baking sheet and roast at 375 degrees fahrenheit for about 5-10 minutes.  Prepare a baking sheet by lightly greasing with olive oil(use a paper towel to apply olive oil to the baking sheet).  Stuff the dates with the toasted almonds then wrap each date with a strip of prosciutto and place on the prepared baking sheet.  When done, drizzle the dates with olive oil and broil in a preheated oven for about 10-15 minutes or until slightly crisp and browned on top.  Remove, let cool for a few minutes, and bite into one....or many. ;-)

Thursday, January 5, 2012

Simple Fried Rice


The dish that I get asked most about is definitely fried rice.  This is a dish every Asian grew up with and everyone has their own version.  It's simple home-cooking that originated as a leftover dish.  With that said, I really just wanted to give the most basic fried rice recipe here and emphasize that you can add almost anything you want to this recipe.  There are only three main ingredients to fried rice and the rest is up to your imagination and taste, or as my Mommie did: anything that was leftover from the night before.  It could be chicken, shrimp, tofu, curry, beef, even hot dogs, or ham.  Just like how you can top pizza with anything you like, you can add any protein, veggies, or seasoning to your fried rice.  See this recipe as the primer coat of paint that you use as a foundation to add your own color and flavors upon.  There are also several ways to make fried rice and there's not right or wrong.  This is MY way because this is how I like it. =)


Ingredients:
2 Cups   Day-Old Cold Rice 
(It's not the end of the world if its not "day-old" rice.  You can use freshly cooked hot rice, but what tends to happen is a mushier fried rice.  Leftover rice for a day or longer in the fridge tends to dry out thus not as pleasant to eat, unless cooked again that's how the whole idea of "frying" leftover rice came about.) 

2 Eggs   Beaten


2 Stalks Chopped Green Onion
Salt and White Pepper Powder (Fresh ground black pepper could be used in place of the white pepper)
Cooking oil


Instructions:
Heat about half a tablespoon of cooking oil in a wok or regular frying pan over medium-high heat.  Coat the bottom of the pan with the oil and add the beaten eggs and a pinch of salt.  Scramble the eggs, remove from pan and set aside.  ***Some people like to stir fry the rice first and add the beaten eggs directly to the pan of rice so that the eggs slightly stick to the rice.*** Turn the heat up to high, add a tablespoon of oil to the pan, then add the rice.  Immediately start breaking up the rice, if there are any clumps, and stir constantly in the pan.  You can flip it if you're feeling confident and fancy!  When the rice is thoroughly heated through, add the green onion then season with salt and pepper.  ***This is the point when you can add any additional ingredients; make sure that any meat or veggies you add are already cooked, do not add raw ingredients!*** Add the scrambled eggs back into the pan and stir to break up the eggs into smaller pieces.  Remove from pan and serve. 

Here's a video to further illustrate the instructions...